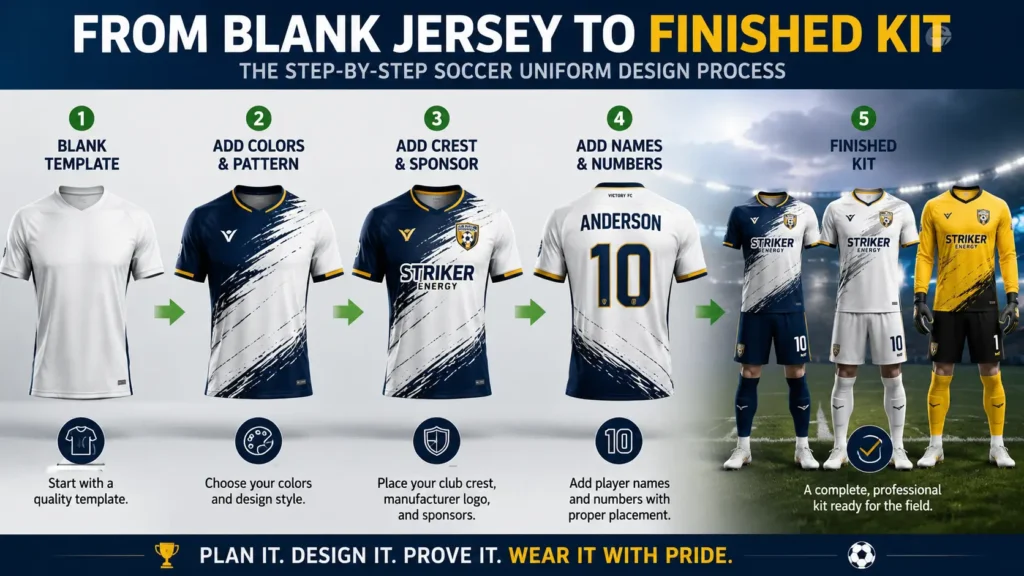
Turn Your Team’s Colors, Logos, and Ideas
Into a Clear, Order-Ready Uniform Design
Designing custom soccer uniforms can be one of the more enjoyable parts of preparing for a new season. It gives your club a chance to build a recognizable identity, showcase sponsors, and give players a uniform they are proud to wear.
Problems usually begin when a team approaches a supplier with incomplete instructions, uncertain colors, conflicting opinions, or a low-resolution logo copied from social media. The supplier then has to request missing information, recreate artwork, revise proofs, and resolve decisions that should have been made before production started.
The goal is not simply to create an attractive jersey. You need an order-ready uniform design that follows league requirements, works across different garment sizes, remains visible during play, and can be reproduced accurately when replacements or reorders are needed.
Key Takeaways
- Check league and tournament requirements before choosing colors, numbers, logos, or sponsor placements.
- Design the complete kit rather than treating the jersey as a separate item.
- Use exact color specifications and high-quality logo files so the supplier does not have to interpret your intentions.
- Prioritize player-number visibility, practical logo placement, and a design that works with the chosen decoration method.
- Finish with one organized design brief and a careful proof review before approving production.
01
Start With the Rules
Confirm league requirements and define every garment the team actually needs before designing anything.
02
Build the Visual Direction
Choose a controlled color palette and one clear design direction that works across the complete kit.
03
Prepare the Artwork
Supply clean club and sponsor logos in usable formats before the supplier begins creating proofs.
04
Make It Work on the Garment
Plan names, numbers, logos, seams, and decoration methods together instead of treating them separately.
05
Turn It Into an Order
Give the supplier one complete design brief and inspect the final proof before production begins.
A strong soccer uniform design is easier to create when decisions are made in the right order. The following nine steps take you from the first league-rule check to an approved supplier proof.
Step 1: Check League and Tournament Rules
Review the applicable uniform regulations before choosing colors, patterns, player numbers, or sponsor placements. Requirements can differ between leagues, tournaments, schools, age groups, and governing organizations.
Confirm any rules governing:
- Player number size and placement
- Whether front numbers are required
- Number placement on shorts
- Permitted sponsor locations and dimensions
- Club crest and competition logo placement
- Home and away color contrast
- Goalkeeper uniform colors
- Player names and other personalization
Do not assume that another team’s uniform proves a particular layout is acceptable. That team may play under different competition rules or have gone through a different approval process.
For example, a league may require a large number on the back and a smaller number on the front. If the jersey has already been designed without room for the front number, the supplier may have to move the club crest, sponsor mark, or another design element.
Save a copy of the applicable requirements and include them with your design information. If a rule is unclear, resolve it before approving the supplier’s proof.
Step 2: Decide What the Uniform Must Include
Do not begin with the jersey alone. First determine the complete home, away, goalkeeper, training, and staff requirements for the team.
Your design may need to cover:
- Home jersey, shorts, and socks
- Away jersey, shorts, and socks
- Goalkeeper uniforms
- Training shirts
- Warm-up apparel
- Coach and staff clothing
If you haven’t determined yet how many kits the team needs, review our guide to planning home, away, goalkeeper, and training kits before finalizing the design.
Decide which garments should coordinate and which must remain clearly different. One team may use the same shorts and socks with two game jerseys to control costs. Another may want two complete kits with separate color combinations.
Consider future replacements as well. A complicated design may be easy to produce as part of the original team order but harder to reproduce if one player needs a replacement jersey in a later season.
Step 3: Establish Your Core Color Palette
Choose two or three core colors and use them consistently across the jersey, shorts, socks, goalkeeper apparel, training shirts, and staff clothing.
A straightforward palette might use:
- Primary color: The dominant color associated with the club.
- Secondary color: Used for panels, stripes, sleeves, shorts, or other larger design areas.
- Accent color: Used more sparingly for trim, numbers, collars, cuffs, or small details.
A team using navy, white, and gold, for example, could use navy as the main jersey color, white for numbers and sponsor lettering, and gold for collar or sleeve accents.
Avoid instructions such as “dark blue” or “bright red.” Those descriptions leave room for interpretation. Provide the club’s official Pantone, CMYK, RGB, or HEX values when they are available, and ask the supplier which color system it uses during production.
Remember that a color displayed on a monitor may not look identical when printed on fabric. If exact brand matching is important, ask whether the supplier can provide a printed sample or fabric swatch.
Number contrast deserves separate attention. A color combination that looks appealing in a close-up mockup may be difficult for a referee, coach, spectator, or player to read from across the field.
Step 4: Choose One Clear Design Direction
Decide whether the club wants a traditional, modern, bold, or minimal appearance before comparing individual supplier templates.
Common soccer jersey design elements include vertical stripes, horizontal hoops, gradients, geometric patterns, pinstripes, contrasting sleeves, shoulder panels, side panels, collar and cuff accents, and subtle tonal graphics.
You do not need to use several of them at once.
A clean navy jersey with a restrained tonal pattern, white numbers, and a gold collar accent may create a stronger identity than a jersey combining stripes, gradients, contrasting sleeves, several colors, and multiple unrelated graphics.
Consider how the design changes across sizes as well. A stripe, panel, or large graphic that looks balanced on an adult large jersey may occupy much more of the available space on a youth size.
Ask Before You Approve the Pattern
Find out whether the supplier scales artwork proportionally for different garment sizes or uses the same artwork dimensions across the entire size range.
Step 5: Prepare High-Quality Club and Sponsor Logos
Artwork problems can slow the design process before the supplier even begins production.
A small JPEG or PNG copied from Facebook, a website, or an email signature may look acceptable on a screen but become blurry or jagged when enlarged for a jersey.
Provide the club crest and sponsor artwork in vector format whenever possible. Common vector formats include SVG, EPS, AI, and editable PDF.
Vector artwork can be enlarged without losing sharpness. If usable artwork is not available, the supplier may have to recreate the logo, which can introduce additional artwork work and delay approval.
Artwork delays also matter when the team is already working against a tight schedule. If timing is becoming a concern, review your soccer uniform ordering timeline before adding more design revisions.
Confirm that you are supplying the correct version of each logo. Sponsors may provide different versions for light and dark backgrounds. A white logo may work on the home jersey while a full-color or darker version may be more suitable for the away kit.
Also make sure the team has permission to use sponsor logos, school marks, club crests, and other protected artwork being submitted for production.
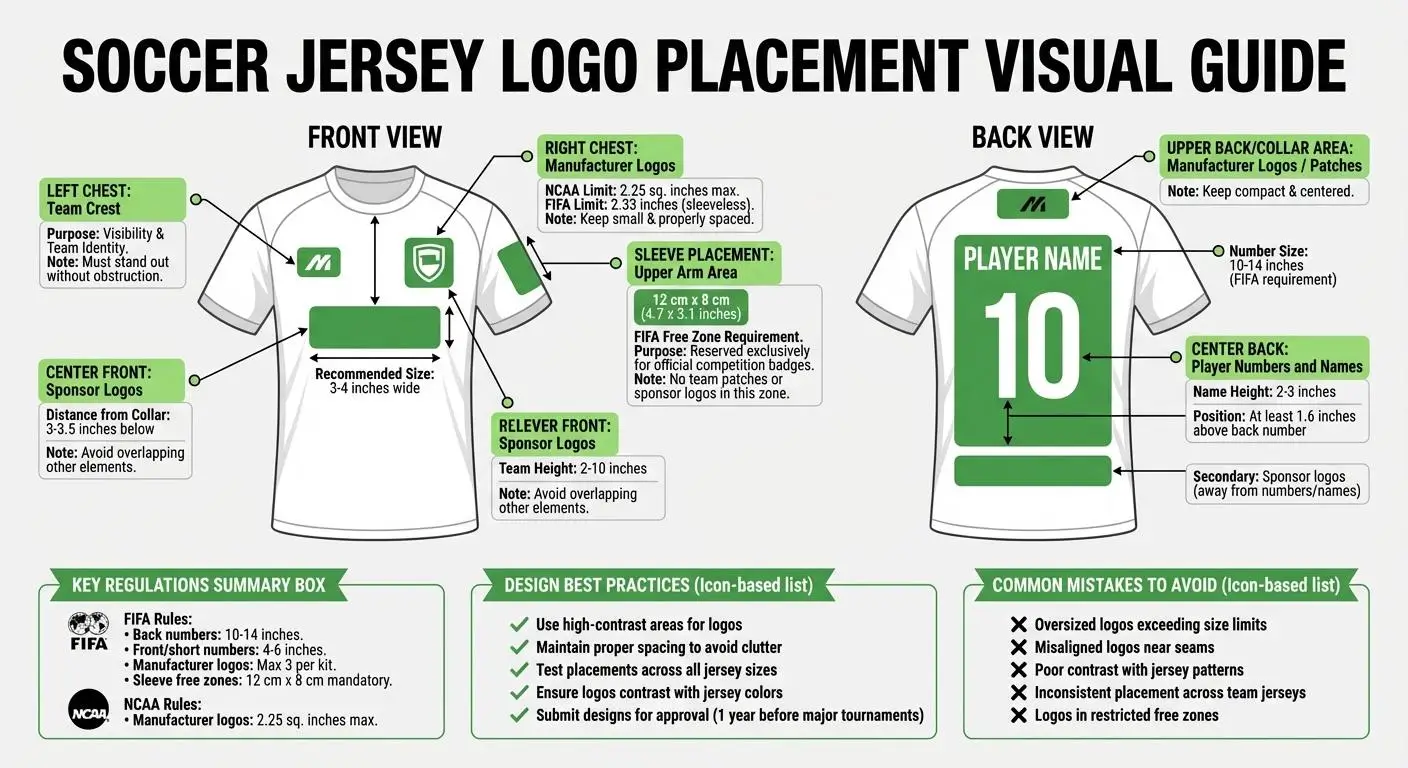
Step 6: Plan Crest, Sponsor, Name, and Number Placement
Once the basic visual direction is established, decide where each piece of information belongs on the actual garment.
A conventional layout may include:
- Club crest: Left chest
- Manufacturer logo: Right chest
- Primary sponsor: Center chest
- Player number: Large and centered on the back
- Player name: Above the back number when used
- Front number: Center chest or another permitted location when required
- Shorts number: Lower left or right leg
- Secondary sponsor: Sleeve, upper back, or shorts when permitted
These are layout possibilities, not substitutes for your league requirements.
More logos do not automatically make a better jersey. Too many sponsor marks can compete with the club crest, player number, and the uniform’s main visual identity.
Check the relationship between artwork and garment construction. Seams, collars, ventilation areas, sleeve joins, and patterned backgrounds can all affect how a logo appears. A sponsor name crossing a seam may distort. A crest placed too close to the collar may become crowded on smaller sizes.
If player names will be used, establish the naming format before sending the roster. Decide how capitalization, punctuation, abbreviations, and longer names should be handled so the supplier is not making those decisions independently.
Step 7: Match the Design to the Decoration Method
The design needs to work with the method being used to decorate the uniform.
Dye sublimation, screen printing, heat transfer, and embroidery have different strengths and limitations.
Dye sublimation provides extensive design flexibility because colors, patterns, logos, names, and numbers can be incorporated into polyester fabric. This makes it well suited to gradients, detailed graphics, and designs extending across large areas of the garment.
Stock jerseys using screen printing or heat transfer generally call for a more restrained approach. Large applied graphics can affect the feel of the garment, while additional decoration elements or colors may affect pricing.
Embroidery is generally more appropriate for items such as coach polos, jackets, hats, and bags than lightweight game jerseys.
Ask the supplier exactly what decoration is included in the quoted price. A sublimated jersey may include several design elements within the garment price, while a decorated stock jersey may be priced separately for crests, names, numbers, and sponsor logos.
Step 8: Build One Complete Design Brief
Once the decisions have been made, consolidate them into one document instead of spreading instructions across emails, text messages, meeting notes, and conversations with several people.
Your design brief should identify:
- Team and club name
- Applicable league requirements
- Home, away, goalkeeper, and training garments
- Official color values
- Preferred design style or supplier template
- Club and sponsor artwork files
- Logo and sponsor placement instructions
- Player-number locations and required sizes
- Player-name format
- Collar, sleeve, and trim preferences
- Decoration method
- Required delivery date
- The person authorized to approve the final design
Designate one person as the main supplier contact. Coaches, managers, club executives, and sponsors can still participate in the review process, but final instructions should go through one person.
This reduces the chance of one person requesting a change that another person reverses later, or the supplier receiving several versions of what is supposed to be the final design.
Step 9: Review the Digital Proof Before Production
The supplier’s digital proof is the final opportunity to identify design problems before the uniforms are produced.
Review the proof at a useful size on a desktop or larger screen rather than relying only on a phone display.
Check that:
- Club and sponsor names are spelled correctly.
- The correct versions of all logos are being used.
- Colors match the approved palette.
- Player numbers have sufficient contrast.
- Required league markings are included.
- Logos are not distorted or positioned awkwardly across seams.
- Home and away uniforms are clearly distinguishable.
- Goalkeeper colors are different from the outfield kits.
- The design works across the jersey, shorts, and socks.
Have at least one additional team official review the proof before approval. A second reviewer may notice a spelling error, missing sponsor, incorrect number location, or other detail that the person managing the order has seen so many times that it is easy to overlook.
Collect the corrections and return them to the supplier in one organized response rather than sending several separate revisions.
When the final version is correct, save a dated copy of the approved proof. Keep it with the order records so you can compare it with the finished shipment and use it as a reference when replacement uniforms or future reorders are required.
Eight Soccer Uniform Design Mistakes That Create Problems Later
Most design problems do not come from choosing the “wrong” pattern. They come from decisions being made in the wrong order or important production details being overlooked.
- Choosing colors before checking league requirements. A design may have to be reworked if home, away, goalkeeper, or numbering rules were overlooked.
- Using low-resolution logos. Poor artwork can create blurry results or force the supplier to recreate the file.
- Adding too many patterns, colors, and sponsor graphics. Each additional visual element competes for space and attention.
- Using numbers that blend into the jersey. Number visibility matters from across the field, not just on a close-up mockup.
- Allowing several people to send supplier instructions. Conflicting revisions can quickly create confusion about which version is current.
- Approving a proof without checking every name, number, and logo. Production should not be the stage where errors are discovered.
- Designing the jersey while ignoring the shorts and socks. The finished uniform is a complete kit.
- Ignoring future replacement orders. Save the final proof, artwork, colors, and specifications so the design can be reproduced later.
From Uniform Idea to Order-Ready Design
The strongest custom soccer uniform designs begin with clear requirements rather than random visual choices.
Check the rules first. Define the complete kit. Establish the colors. Choose one design direction. Prepare usable artwork. Plan the numbers, names, and logos around the actual garment and decoration method. Then put every approved decision into one design brief.
By the time the supplier receives that brief, the major decisions should already be settled. The proof then becomes what it is supposed to be: a final check of an agreed design rather than the beginning of the design process.
That preparation reduces unnecessary revisions, gives everyone involved a clear approval point, and leaves the club with a documented uniform design that can be referenced when the finished order arrives or another jersey is needed later.
“`